Friday, 29 June 2012

Panic Buying: Guilty!


Some people panic buy petrol, some food, but for me it's makeup brushes! Some people might see this as tragic, but I am also sure that I am not alone, there must be more people out there who can empathise with me?! 

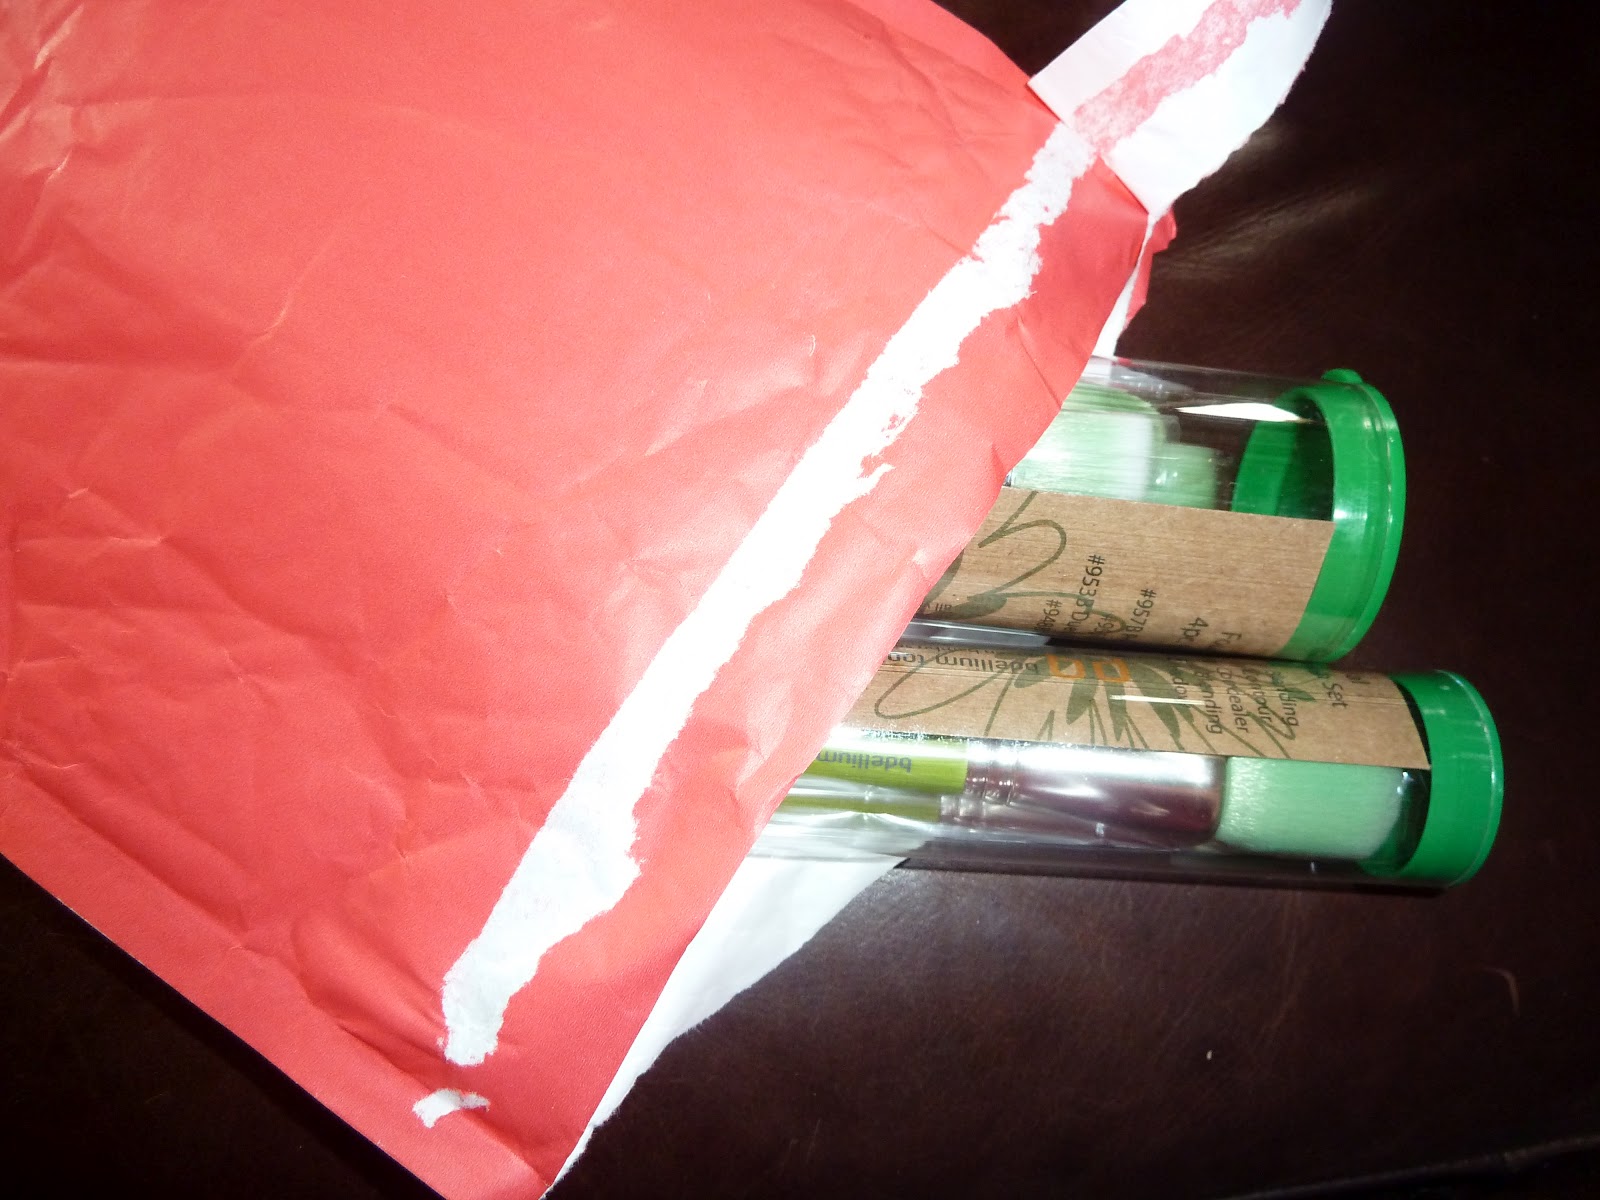
This purchase is from Shop Louella, which has been created by the wonderful Louise from Sprinkle of Glitter and Zoe from Zoella, in their shop they are aiming to only sell the things that they love - a selection of their favourites if you will.  Currently they are only stocking makeup brushes, bdellium tools green bamboo brushes to be precise but I do believe they have plans to eventually stock more wonderful cosmetics (dear wallet, I apologise in advance).  I purchased the 5 piece 'Smokey Eye' set when they first launched the shop, but I thought I'd be good and wait before purchasing any more as to be honest I don't NEED them.  This all changed however, when Louise mentioned that they were running dangerously low on stock and weren't going to be getting more in for a while - cue me literally scrambling around, checking my bank balance and deciding I couldn't afford them placing an order - I kid you not, I was like a woman possessed (how many times have you heard me say this in relation to makeup related purchases? I must get a grip).  For once though, I have not suffered from shoppers remorse, I just felt very satisfied and excited to see that they had arrived in their gorgeous bright coral envelope.  And if, for any reason, the guilt comes to haunt me, I can easily swipe it away because bdellium tools are basically impossible to get hold of in the UK, so it isn't as though I could get them any old time, this could well have been a once in a lifetime opportunity and you just can't pass those up!!

Oh and the sets I purchased are: The Green Bamboo 4 Piece Foundation Kit which consists of a Precision Kabuki, a Finishing brush, a Duo Fiber Foundation brush and a Foundation brush and the Green Bamboo 5 Piece Mineral Brush Kit which is made up of a Powder Blending brush, a Slanted Contour brush, a Precision Concealer brush, a Large Tapered Blending brush, and a Large Shadow brush.
Each set costs £33.95 and postage and packaging was £4.50 I think (which isn't cheap, but they did come within two days).

I look forward to giving these a try, and I will report back with a review once I have used them, and seen how they fare after a wash! 


Please tell me I'm not the only one to panic buy "nonessentials"?

x

Empties

It is time to declutter and finally do an 'empties' post! These things have been hanging around for a week or so, and I keep trying to tidy up and being really frustrated that I can't put them all in the recycling because I haven't taken photos! But here are the photos so farewell products, thanks for being so good to me!

So, lets get to it...

Face related empties


L'Oreal Paris Triple Active Ideal Balance Cleansing Wipes - I do love a good face wipe, and these, my friends are rather lovely.  I purchased them in a 2 for 1 sale so it made them nice and cheap as well.  They aren't too exciting (I've never experienced an exciting face wipe, have you?) but they do the job or removing make up rather well! My housemate used them once and I quote "Oh, these are lovely, they just smell so posh" - and who wouldn't want a posh smelling face wipe I ask you?! 
These are available at Boots and Superdrug but I can't find them online, and also in large supermarkets.


Hair related empties


TIGI Bed Head Epic Volume Shampoo and Conditioner - I love these. They smell amazing, so regardless of their value I would always love them for that, it's the most girly strawberry delicious scent! (which unfortunately I've only smelt a couple of times because I have zero sense of smell 99.9% of the time! I don't know how well they boost the volume of my hair, because to be honest my hair tries its hardest to be flat as a pancake at all times, but it certainly doesn't weigh it down so I'm not complaining. I would definitely repurchase these! 
Get it at FeelUnique or CheapSmells

Toni & Guy Boost-it Mousse - They have actually discontined this product, and I am utterly gutted.  I love this stuff, it is so easy to use (just spray it directly onto the roots in sections around your head, then blow dry with your head upside down for max volume) and it really does deliver the 'volume boost with natural hold' that it claims - so it does just what it say on the tin! I got the Volume Plumping Mousse when I went to replace my Boost-it Mousse but after reading some awful reviews I'm scared to try it!  Why do companies do this - if it ain't broke, don't fix it!  


Now, onto Shower empties


Gillette Satin Care Shave Gel for Sensitive Skin - There isn't really much to say about this, other than that it does the job! A lot of my friends don't use a shaving gel, making do with shower gel, but I wouldn't be without it. 
At £3.25 from Boots I don't think you can go far wrong.  They often have it on sale too!


Treacle Moon The Raspberry Kiss - This deliciously scented exfoliator is lovely, and a little goes a long way so it has lasted me a long time.  I really like that the exfoliating particles are really small, so when you massage it in you can really feel it doing the work.  I love the cute little love story thing on the front as well, and I like to read it in the shower as it's at eye level! It's also cheap which is a bonus! 
I do believe I got this from Tesco! 

Original Source Vanilla Milk and Raspberry - I love the concept of Original Source products, and I'm always intrigued by how many fruits, or sunrises in this case, it takes to make one bottle. For me this is a little bit too sweet, I think it's the vanilla milk that's a little too sickly.  I like it none the less, and just as well because I got one in my stocking at Christmas (and the hand soap) so I've got plenty more to get through! 
I can't see this on either the Boots website or Superdrug, but have a look in store or in supermarkets if you fancy it! 

Nail empties


Cutex Nourishing Nail Polish Remover for weak nails - Well my nails are most certainly weak, and to be perfectly honest they have remained weak throughout the time I've been using this.  I'm not blaming this product, and they might be a lot worse if it hadn't been for this, who knows - all I'm saying is don't expect a miracle cure if you have weak nails (not that I think many people would turn to a nail varnish remover to sort that out anyway!)
£1.60 from Boots or £1.59 from Superdrug - i've got to admit I tend to opt for Boots because despite the extra penny I'll do anything for my Boots points! 


I hope you're all well, and if anyone has a recommendation to replace my Toni & Guy Boost-it Mousse I would greatly appreciate it! 

x

Tuesday, 26 June 2012

Review: Sleek MakeUP Storm Palette

Behold my first sample of what Sleek MakeUP has to offer! 

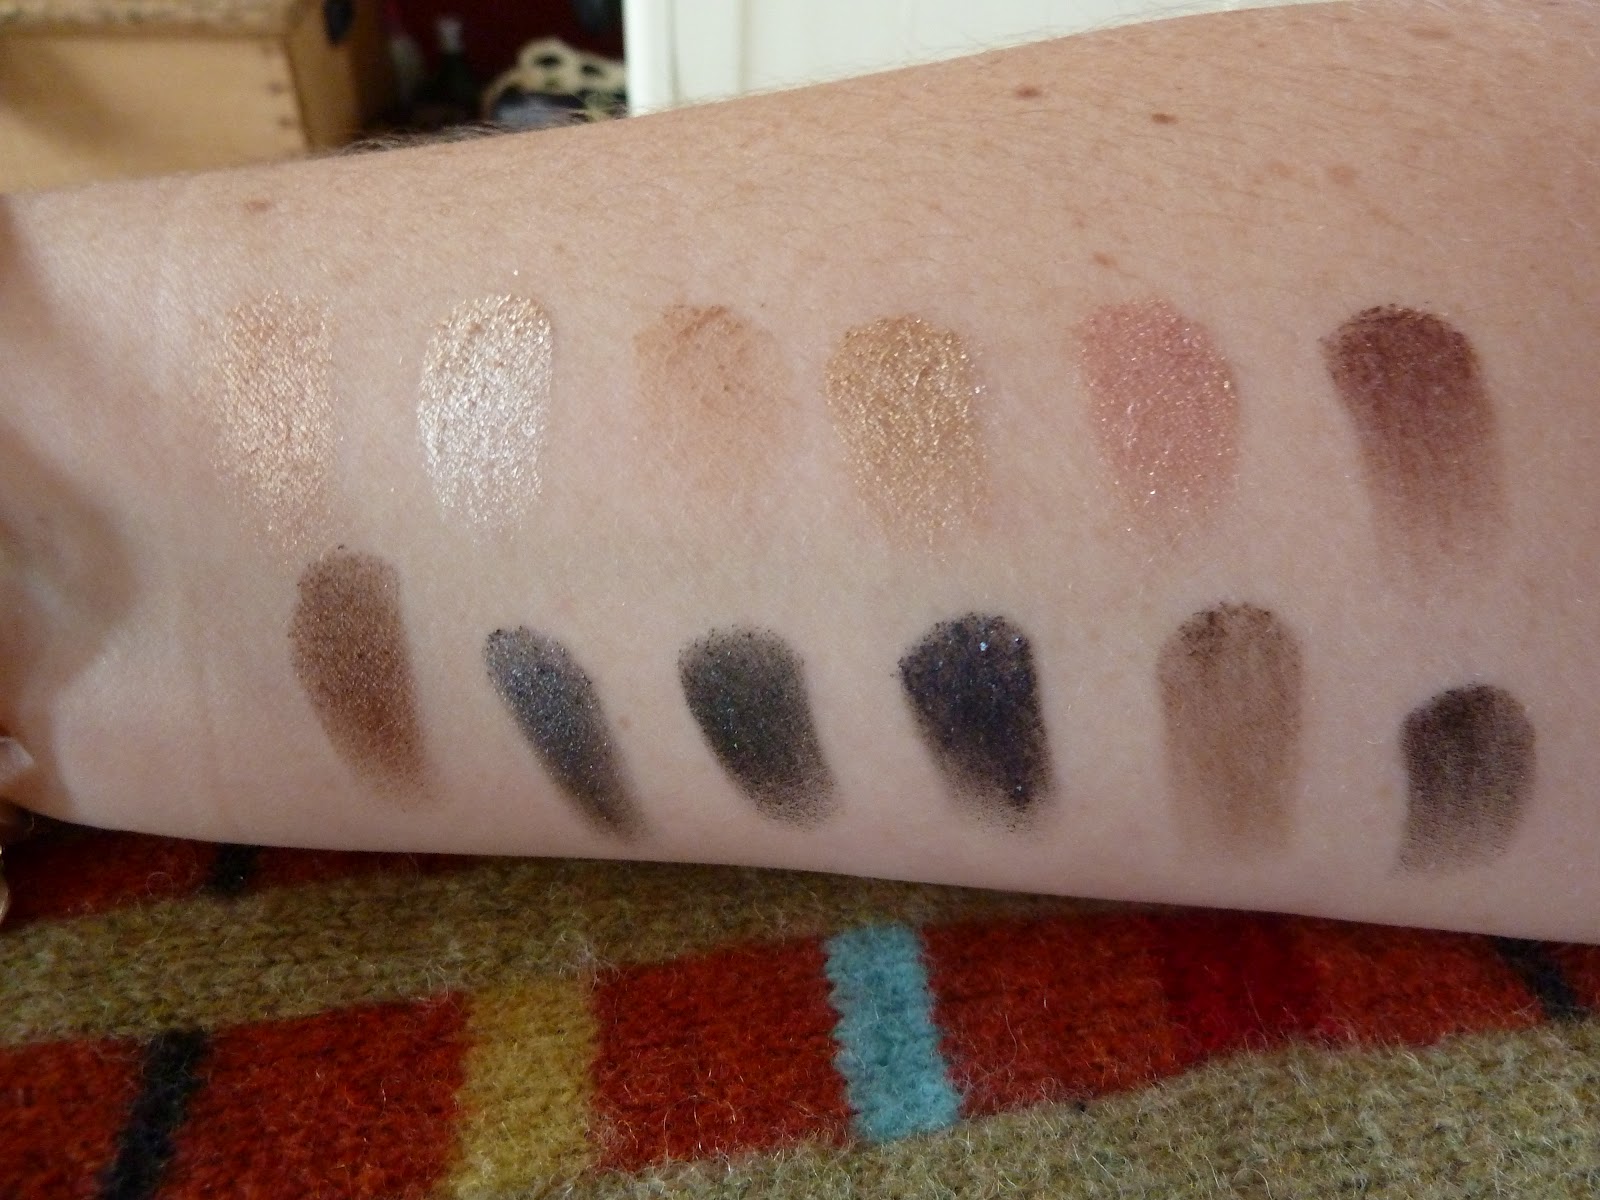
I bought this palette ages ago from Superdrug for £6.49 which, for 12 eyeshadows has got to be a bit of a steal, but I've never got around to using it, or even swatching it - but the time has come to put it to the test! 

I've got to admit that I'm a bit phobic of eyeshadows that crease, or have a lot of fallout, and therefore I've become a little addicted to MAC eyeshadows; they are just so easy to work with, they are highly pigmented and they stay put, so I was a little apprehensive about this palette - you get 12 eyeshadows for half the price of one MAC eyeshadow so surely there has to be a quality compromise?

 Top swatches - natural lighting, Bottom swatches - with flash

To tell you the truth, I was shocked by the pigmentation of most of the shades in this Storm neutrals palette.  Of course there were a couple of exceptions - the matte shades were pretty powdery and lacking in any depth when swatched, which is a bit of a shame as these are really the staples to any good neutrals palette, and without them I worry how much use I would get. 
Matte colours aside, the pigmentation and texture of the shimmery/glittery shades was amazing, they feel really creamy and rich and the colour payoff is great.  I am really impressed with the range of colours as well, I think there is something there for everyone really. 

Despite my disappointment with the matte colours I decided to put them to the test this morning.  I applied my Urban Decay primer potion all over the lid, then I used the lightest matte shade all over the lid, up to the socket, and then the darker matte brown in a triangle on my outer corner (I finished up with Teddy eye pencil by MAC along my lash line and lashings of my favourite mascara L'Oreal Double Extension Beauty Tubes) to finish it off I popped a little bit of the champagney coloured shimmer in my inner corner to brighten my eyes a bit. I was pleasantly surprised by how well these applied and blended - I was expecting it to be a bit of a crumbly mess but it wasn't, and even more surprising is that 7 hours later it still looks ok! I don't know if this is due to using a primer or not, so maybe I will do a comparison another day.

All in all, for £6.49 I don't think you can go wrong.  Sure they're not high end quality, but neither is the price and they are certainly aren't BAD quality either. A thumbs up from me! 

x

Out with the old, and in with the new

This is just a quite note to explain the sudden change in the appearance of my blog.  After chatting to Alexandra and Mel I decided that it was time for a shake up where my blog layout was concerned.  Previously I was using a dynamic layout which I believe was the magazine format.  I loved the way my posts were displayed, but I do believe blogger has missed a trick in creating this style because it made it practically impossible for people to find out how to follow me and all of that jazz.  Obviously I'm not writing this blog to just try and get loads of readers but it just seems like a shame if there are people out there who want to read what I write but can't easily see how to follow me. For the time being I've just converted my layout to 'simple' but Alexandra is very kindly helping me to come up with a more attractive layout and I am so excited to see the finished product once the facelift is complete!! 

Monday, 25 June 2012

Antique Turquoise

I saw this tutorial on The Beauty Department and I knew I needed a slice of that pie! For someone creative, I'm pretty uninterested in nail art.  I love it on other people, but I never have confidence in my ability, and so I tend to steer clear to avoid totally buggering it up and being left with hideous nails and an hour of my life down the drain (ombre and marble nails spring to mind!). See this post for my only other dip into the nail art ocean!

Anyway, I saw this concept and I thought it should be within my skill range! I'd just painted my nails with Essie's Mint Candy Apple (see this post for pics), so it seemed like the perfect time to give it a go!


All you need for this is: A freezer bag, something to protect your table, an old piece of paper or something to dab off excess colour on to, a paintbrush (but a cotton bud, or orange stick covered in cotton wool would be fine), some nail varnish remover, and your metallic colour or choice.  Obviously I had already painted my nails but if you hadn't you'd want to do that as the first step.
So, step 1) paint your nails 
2) Depending on the size of your freezer bag either just scrunch it up (or cut a section off and scrunch that) 
3) Paint your metallic colour onto the scrunched bag)
4) Dab it off a couple of times onto scrap paper (this way you can also see if you've got it scrunched enough/got enough paint on it and then edit accordingly)
5) Press it onto your nails, once or twice until you're happy with the pattern
6) Reapply paint to the scrunched bag after every couple of nails, or as you feel you need to
7) Dip either your paintbrush or cotton bud/orange stick into nail varnish remover and use it to clean up your fingers! 
8) Apply your favourite top coat, then sit back and admire your handy work! 

Honestly this took me about ten minutes (if that) and the only tricky bit was getting the mess off my fingers, but that's because I used the worlds worst brush, so if you used a nice smooth brush it would be even quicker!

I have ended up with more gold than the original tutorial but I still really like the effect - it reminds me of vintage crockery.


Let me know if you end up giving this a try! And if you have any relatively easy nail art ideas I'd love to give them a try! 

I hope you're all well, and thanks for reading.

x